
Tag every piece of your documents with who owns it, how current it is, and who may see it, then make the search apply those tags while it looks for matches. If you only check the tags after the search, private documents can reach the wrong customer, and users can get empty answers.
Imagine you run an AI assistant that answers questions from many companies’ documents. One customer asks about loan rates, and the closest matches in the whole collection happen to belong to a different customer. If your code throws those away only after the search, the user gets nothing, and another company’s files have already passed through your system.
This post is part of the RAG from scratch series. RAG, short for retrieval-augmented generation, is a setup where an AI first looks up passages in your own documents and then writes an answer from them. The pieces it looks up are called chunks: short passages cut from longer documents. The tags attached to each chunk are called metadata, which simply means data about the data.
Filter during the search, not after it
Filtering after the search checks the rules too late. The search engine has already picked the closest matches from everyone’s documents, and your code then throws away the ones the user may not see. Filtering during the search applies the rules first, so the engine only compares the question against chunks the user is allowed to see.
Here is why that matters. The documents live in a vector database, a database that stores each chunk as a list of numbers (an embedding) that captures its meaning, so it can find chunks with similar meaning to a question. To stay fast, it does not compare the question with every chunk. It walks a shortcut map of the numbers and returns the closest few, for example the top 20.
Now suppose the collection holds documents from fifty client companies, and one of them writes far more about the topic being asked. Its chunks could fill all 20 top spots. If your code then removes every chunk from other companies, nothing is left, even though the right answer for this user was sitting at spot 21. You also spent time on comparisons you threw away, and another customer’s text briefly sat in your application’s memory.
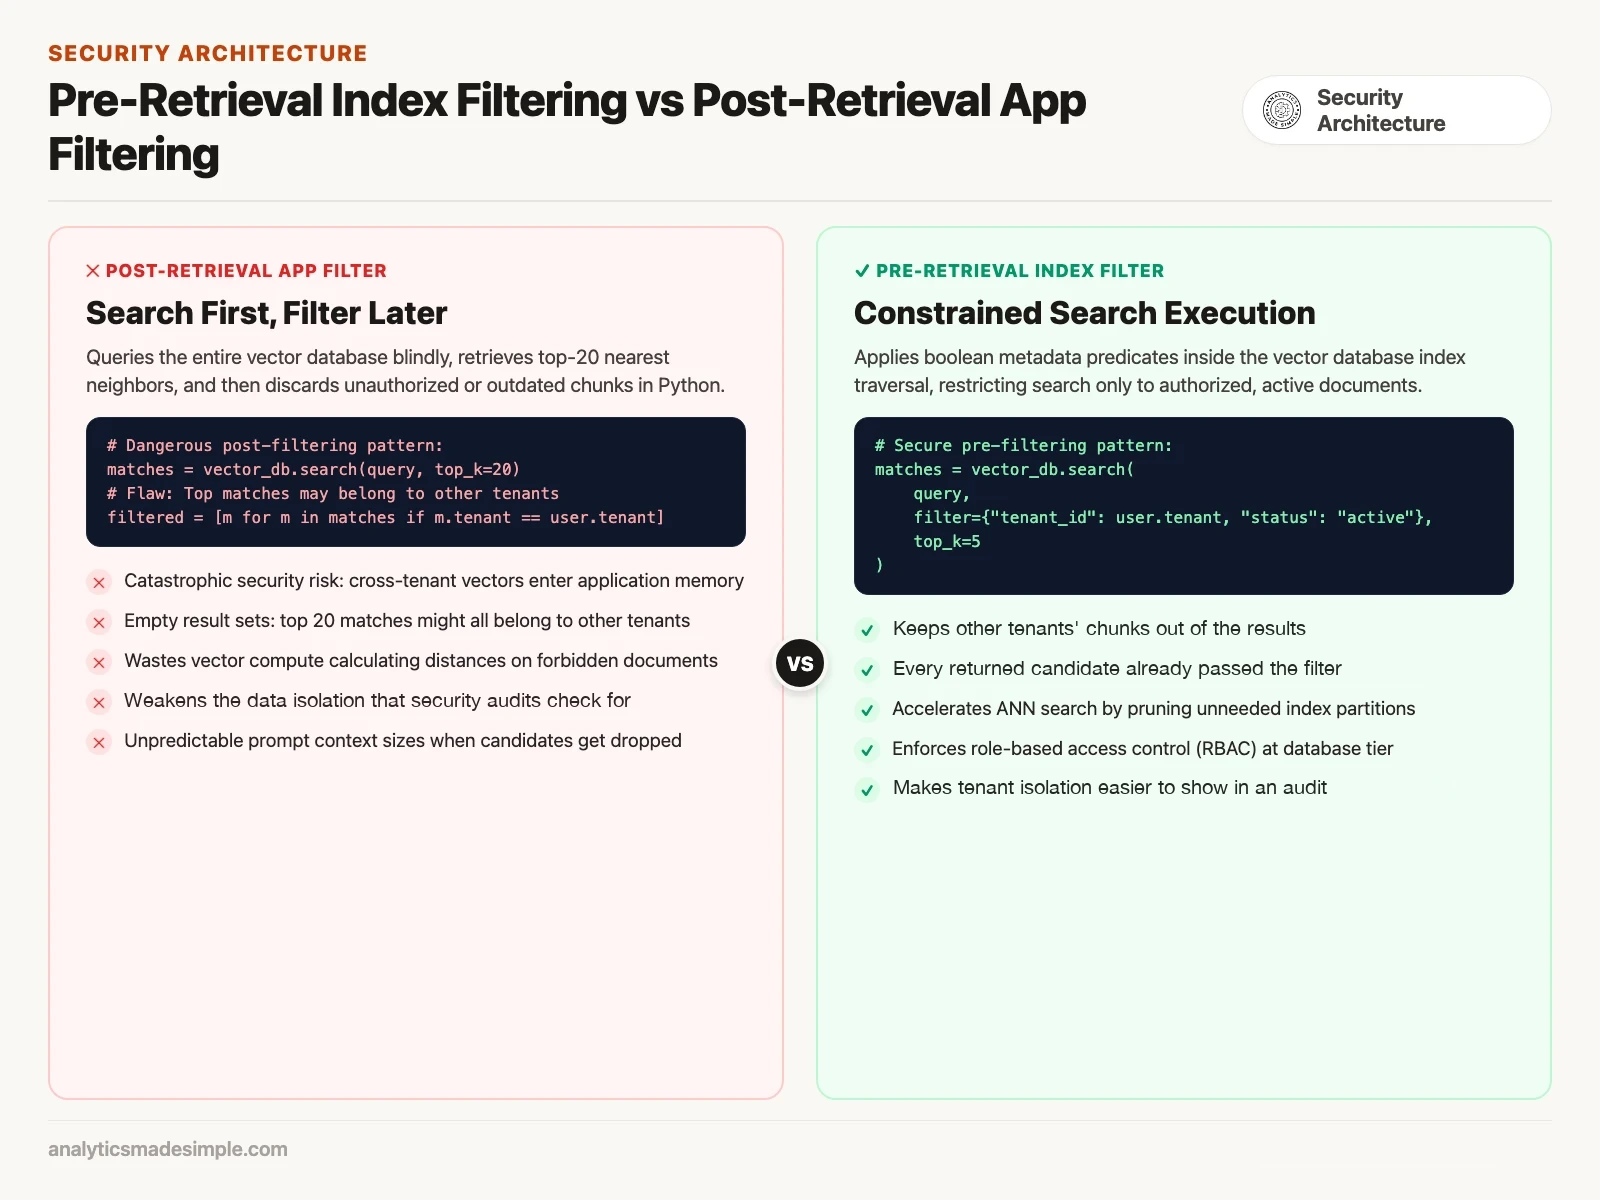
Filtering during the search fixes both problems. Vector databases such as Qdrant and Pinecone let you pass a filter, such as tenant_id == 'bank_alpha', along with the question. The database keeps an index of the tags next to the vectors, so it skips chunks that fail the filter while it searches, and every result it returns has already passed (both documentation pages checked October 2026).
pgvector, the vector add-on for the PostgreSQL database, works a little differently, so check its behavior before you rely on it. With its fast approximate indexes, the WHERE filter is applied after the index scan, inside the database. That still keeps other customers’ rows out of your application, but it can return fewer results than you asked for. Version 0.8.0 added iterative index scans, which keep scanning until enough rows pass the filter.
The four kinds of metadata every chunk needs
Every chunk should carry four kinds of tags: who it belongs to, how current it is, who may see it, and where it came from. When you load documents, it is tempting to store only the text, an ID, and its embedding. That shortcut is easy at first and painful to fix once the system is live.
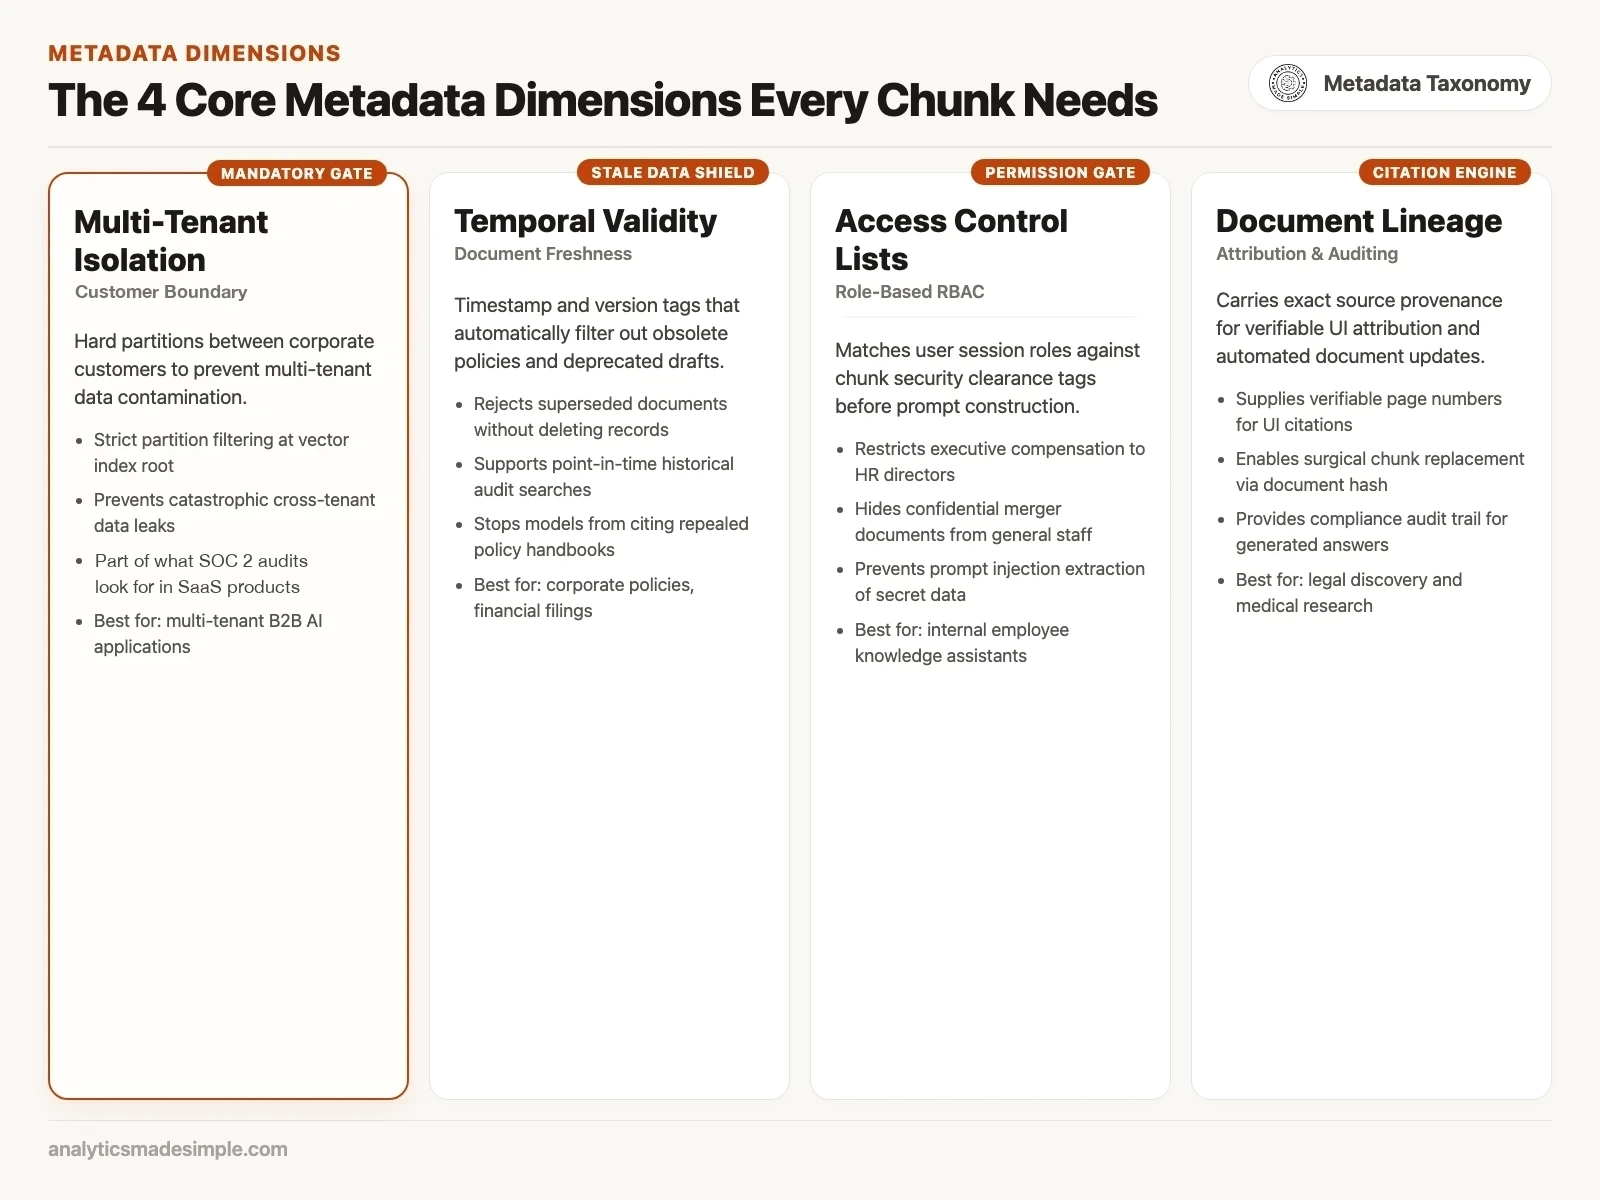
Here is what each kind of tag does in practice.
- Owner (
tenant_id,workspace_id): which customer the chunk belongs to. In a product that serves many customers, each customer is called a tenant, and this tag is the line that must never be crossed. A question from one customer should never see another customer’s chunks, and security audits look for exactly this kind of separation. - Date and version (
created_at,valid_until,version_status): how current the chunk is. Policies and price sheets change, so tagging each chunk with dates and a status such as active or superseded lets search skip old drafts while you keep them on file for audits. - Access level (
role_required,department_acl): who inside the company may see it. Even within one company, a new hire in marketing should not be able to pull up board minutes or HR complaints. An access control list (ACL) is simply the list of people or roles allowed to see something, and the search can check each chunk against the current user’s list. - Source (
source_file,page_number,doc_hash): where the chunk came from. The file and page let your app show a real citation. The hash, a short fingerprint of the document’s contents, tells your loading job when a document changed, so it can replace only the affected chunks.
Pre-filtered search in Python
The example below shows the idea in plain Python. It checks each chunk’s tags first, and it only scores the chunks that pass. Scoring uses cosine similarity, a number between -1 and 1 that is higher when two lists of numbers point in the same direction, which here means the chunk’s meaning is close to the question’s.
The data is a small made-up collection for two fictional banks. The user is a junior loan officer at Bank Alpha with access level 1.
import math

def cosine_similarity(vec_a: list[float], vec_b: list[float]) -> float:
    dot = sum(a * b for a, b in zip(vec_a, vec_b))
    norm_a = math.sqrt(sum(a * a for a in vec_a))
    norm_b = math.sqrt(sum(b * b for b in vec_b))
    return dot / (norm_a * norm_b) if norm_a and norm_b else 0.0

# Mock multi-tenant document corpus with rich metadata payloads
document_database = [
    {
        "id": "chunk_101",
        "tenant_id": "bank_alpha",
        "status": "active",
        "acl_level": 1,
        "title": "Alpha: Commercial Loan Rates 2026",
        "vector": [0.88, 0.21, 0.45]
    },
    {
        "id": "chunk_102",
        "tenant_id": "bank_alpha",
        "status": "deprecated",
        "acl_level": 1,
        "title": "Alpha: Legacy Loan Schedule 2022",
        "vector": [0.91, 0.19, 0.42]  # High similarity, but outdated
    },
    {
        "id": "chunk_201",
        "tenant_id": "bank_beta",
        "status": "active",
        "acl_level": 3,
        "title": "Beta: Executive Incentive Plan 2026",
        "vector": [0.95, 0.15, 0.38]  # Perfect match, but belongs to another tenant!
    },
    {
        "id": "chunk_103",
        "tenant_id": "bank_alpha",
        "status": "active",
        "acl_level": 2,
        "title": "Alpha: Executive Compensation Summary",
        "vector": [0.89, 0.25, 0.39]
    }
]

def search_with_pre_filter(
    query_vector: list[float],
    user_tenant: str,
    user_acl: int,
    top_k: int = 2
) -> list[dict]:
    valid_candidates = []

    # Step 1: Pre-filtering phase (enforces tenant isolation and security ACLs)
    for doc in document_database:
        if doc["tenant_id"] != user_tenant:
            continue
        if doc["status"] != "active":
            continue
        if doc["acl_level"] > user_acl:
            continue

        # Step 2: Compute vector similarity only on authorized candidates
        score = cosine_similarity(query_vector, doc["vector"])
        valid_candidates.append({**doc, "similarity": score})

    valid_candidates.sort(key=lambda x: x["similarity"], reverse=True)
    return valid_candidates[:top_k]

# User session: Junior Loan Officer at Bank Alpha (tenant: bank_alpha, ACL level: 1)
query_vec = [0.92, 0.20, 0.40]
results = search_with_pre_filter(query_vec, user_tenant="bank_alpha", user_acl=1, top_k=2)

print(f"{'Chunk ID':<10} | {'Title':<38} | {'Score':<8} | {'Security Check'}")
print("-" * 75)
for r in results:
    print(f"{r['id']:<10} | {r['title']:<38} | {r['similarity']:.4f} | PASSED (Tenant + ACL 1)")
When you run it, three chunks are removed before any scoring happens. chunk_201 belongs to the other bank, chunk_102 is an outdated draft, and chunk_103 needs access level 2. Only one chunk is left to score. The table below shows each chunk and why it passed or failed.
| Chunk Identifier | Document Title | Cosine Score | Security & Freshness Result |
|---|---|---|---|
chunk_101 | Alpha: Commercial Loan Rates 2026 | 0.9980 | Authorized (Active · Bank Alpha · ACL 1) |
chunk_103 | Alpha: Exec Compensation Summary | Excluded | Rejected (Requires ACL 2; User has ACL 1) |
chunk_201 | Beta: Exec Incentive Plan 2026 | Excluded | Rejected (Belongs to Bank Beta; Cross-Tenant) |
chunk_102 | Alpha: Legacy Loan Schedule 2022 | Excluded | Rejected (Status is Deprecated) |
Let the system add the security filter, not each developer
In a real product, the security filter should be added automatically from the user’s login, not typed by each developer. If someone forgets the filter in an ordinary database query, the database returns rows the user should not see. With an AI assistant the damage can be worse, because the leaked text ends up inside a confident, well-written answer.
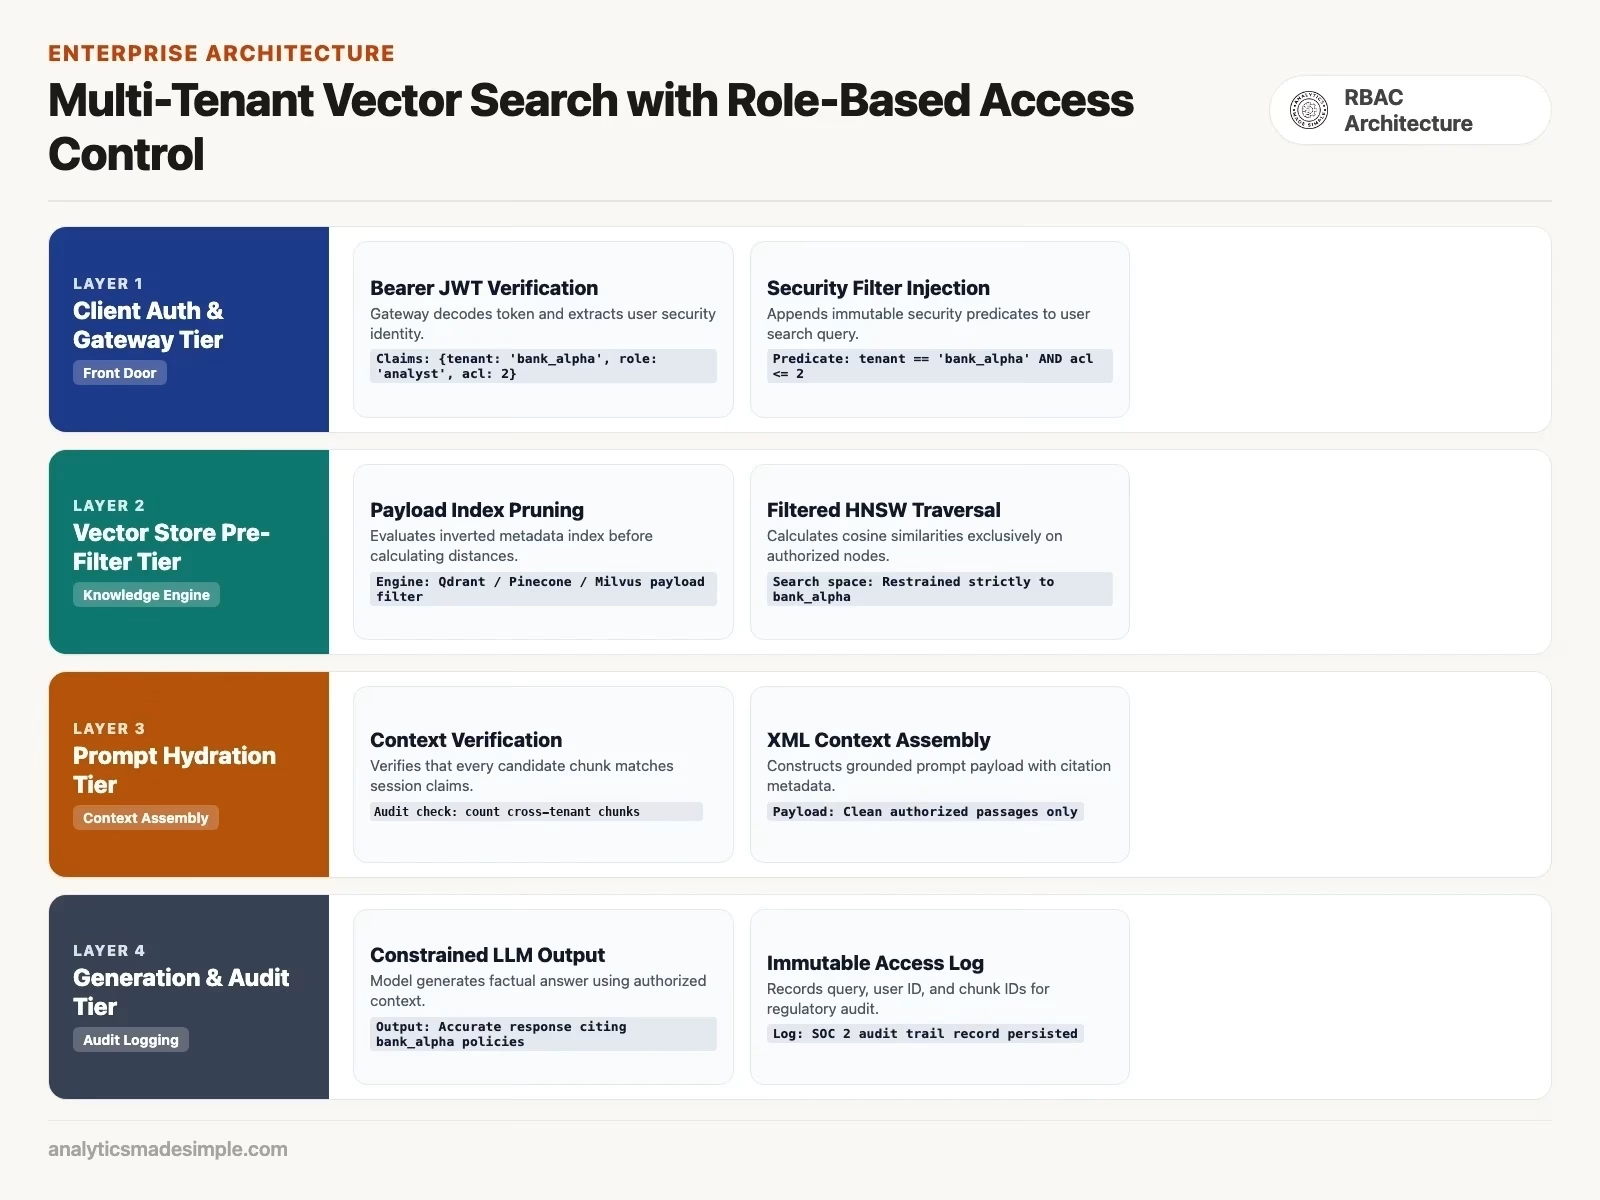
Production systems usually handle this in four steps.
- Check the login. Each request arrives with a signed login token, often a JWT, which is a small signed file that says who the user is. The front door of your system, called the API gateway, checks the signature and reads the user’s customer, role, and access level from it.
- Add the filter automatically. The gateway wraps the user’s question with a filter that application code cannot remove, for example
{"tenant_id": "fin_corp_04", "acl_level": {"$lte": 2}, "is_active": True}. - Search only allowed chunks. The vector database applies that filter while it searches, so it only compares the question with chunks this user may see.
- Build the answer and log it. The matching passages go into the AI’s prompt, and a log records the user, the time, and the exact chunks used, so you can answer an auditor’s questions later.
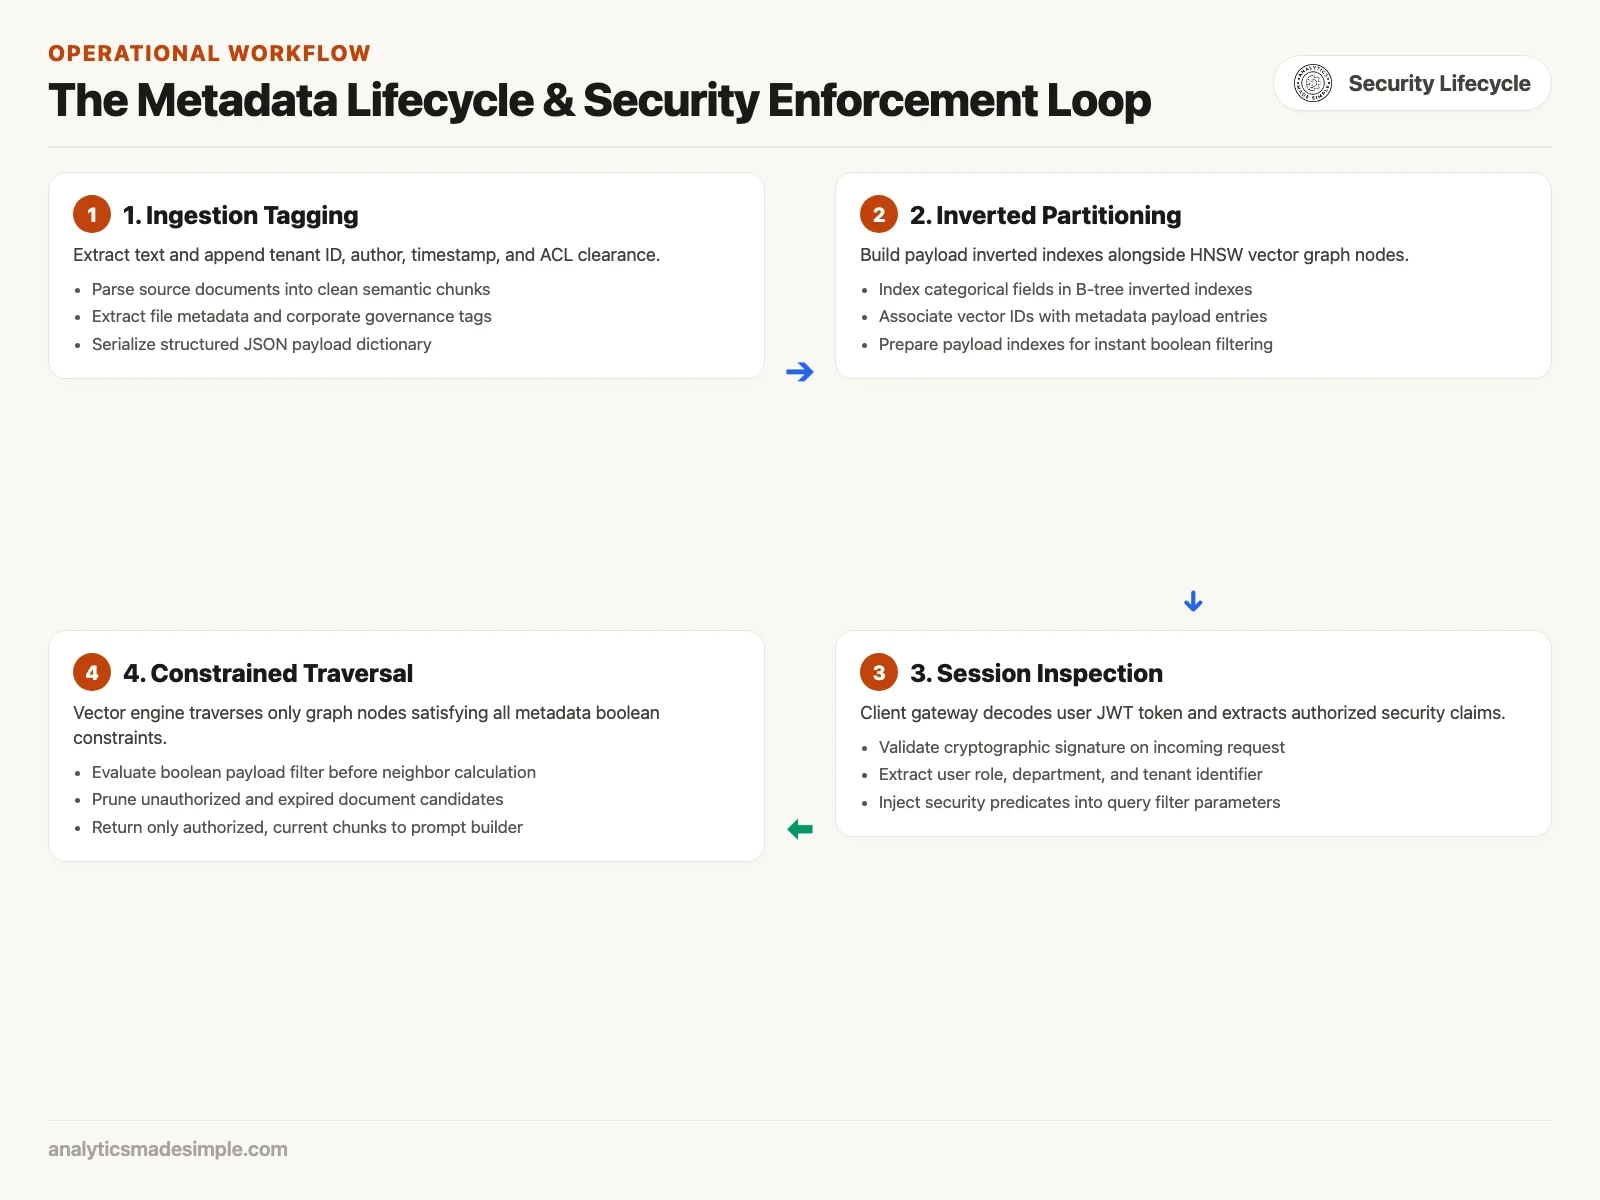
Rules to put in place this week
Require the same set of tags on every chunk, apply security filters inside the database search, and retire old document versions automatically. If you are reviewing your own setup this week, start with these four rules.
- Require five tags. Every chunk you load should have
tenant_id,document_id,created_at(a date in the standard year-month-day format),status(active or archived), andacl_level. Reject any loading job that leaves one out, because a missing tag is a gap nobody notices until something leaks. - Never rely on after-the-search filtering for security. Use your database’s built-in filtering during the search. If it cannot do that, consider an engine that can, such as Qdrant or Pinecone, or turn on pgvector’s iterative scans.
- Retire old versions automatically. When someone uploads a new version of a handbook, do not rely on a person to remove the old one. Have the upload trigger an automatic step that marks every chunk from the previous version as superseded. The old chunks stay on file for audits but drop out of search right away.
- Index the tags you filter on. Tell the database to build an index on fields such as
tenant_idandstatus. Without an index, it has to check every chunk to apply the filter, which slows down every question.
The next post in this series covers citations: how to link each claim in an AI answer back to the exact document and page it came from, so the reader can check it.
Sources and reference reading
- Qdrant Vector Database, 2024, Payload-Based Filtering and Indexing Architecture, Documentation, https://qdrant.tech/documentation/concepts/filtering/
- Pinecone Systems, 2024, Metadata Filtering in Production Vector Indexes, Architecture Guide, https://docs.pinecone.io/guides/search/filter-by-metadata
- OpenAI Platform, 2024, Vector Stores and File Search Tool Security, Assistants API Reference, https://developers.openai.com/api/docs/guides/tools-file-search
- OWASP Foundation, 2023, OWASP Top 10 for Large Language Model Applications: LLM06 Excessive Agency & Sensitive Information Disclosure, https://owasp.org/www-project-top-10-for-large-language-model-applications/
- PostgreSQL Global Development Group, 2024, pgvector: Vector Similarity Search for PostgreSQL, GitHub Repository, https://github.com/pgvector/pgvector
Sources and reference reading
- Qdrant documentation, Filtering, https://qdrant.tech/documentation/concepts/filtering/ (checked October 2026)
- Pinecone documentation, Filter by metadata, https://docs.pinecone.io/guides/search/filter-by-metadata (checked October 2026)
- pgvector on GitHub, README, sections on filtering and iterative index scans, https://github.com/pgvector/pgvector (checked October 2026)
- OpenAI API documentation, File search, https://developers.openai.com/api/docs/guides/tools-file-search (checked October 2026)
- OWASP Foundation, OWASP Top 10 for Large Language Model Applications, https://owasp.org/www-project-top-10-for-large-language-model-applications/ (checked October 2026)
Series notes
This is Part 4 of RAG from scratch. Previous: embeddings. Next: citations and show-me-the-source UX.
Keep going
Same lessons in your feed
Short diagrams, hooks, and weekly tutorials on Substack, Instagram, X, and Facebook.