

Claude Code is Anthropic’s AI coding tool that runs in your terminal, the text window where you type commands, and it can read and change the files in a project. Install it, sign in, and start your first session in a copy of a project you can afford to mess up, before you use it on real work. Imagine a teammate tells you to use Claude Code to get to know a new project. You don’t want a debate about AI tools; you want it installed, signed in, and one safe first session that changes nothing you care about.
This post covers installing Claude Code, opening it, logging in, and surviving your first run without breaking anything. Later posts in this series get into talking to a codebase: asking questions, exploring, then making changes. If you still need the product family map, meaning chat versus Code versus Cowork, start with the Claude product map. If everyday Claude chat still feels foggy, use Learn Claude from scratch first, then come back here.
Commands and plan names move over time. Re-check Anthropic’s docs at code.claude.com/docs/en/quickstart and setup the week you roll this out for a team.
What you need before the install
Claude Code is a coding agent that works on real project folders. It is not a second copy of the Claude.ai chat window with a darker theme. You will get more out of your first run if four things are true.
- A project directory you are allowed to open. Prefer a personal sandbox or a throwaway clone over production on day one.
- An account path that includes Code access: a Claude Pro, Max, Team, or Enterprise-style subscription as marketed, a Claude Console account with billing set up, or access through a supported cloud provider your company already uses. Details shift, so confirm on the live pricing and login pages.
- A terminal you can open if you follow the command-line install path (Terminal.app, iTerm, or Windows Terminal; on Windows you may also use Windows Subsystem for Linux (WSL), a free Microsoft feature that runs Linux tools). If the terminal still feels hostile, use the desktop app or an editor extension instead, and treat the command line (the text window where you type commands) as optional homework for later. The official docs also link a terminal guide for absolute beginners.
- Company policy clarity if this is work code. Personal keys sitting in a corporate monorepo is how security tickets get born, so if policy is silent, ask before your first pull request.
Git helps a lot. On native Windows, Anthropic’s quickstart notes that Git for Windows is recommended so Claude Code can use its Bash tool; without it, PowerShell becomes the shell tool instead. WSL setups do not need Git for Windows for that reason. You can still learn without perfect git habits, but “review the diff before commit” is much easier when git exists.
Install paths
Anthropic’s quickstart lists three common install families for the CLI. CLI is short for command-line interface, the text window where you type commands instead of clicking. Native install is marked recommended, and it auto-updates in the background. Homebrew and WinGet are first-class alternatives, but their upgrades are manual.
Native install: macOS, Linux, WSL
In a terminal:
curl -fsSL https://claude.ai/install.sh | bashThat one-liner fetches the official install script and runs it. Piping a download straight into bash is normal in this ecosystem, and it’s still worth a pause, because you are trusting Anthropic’s host and its secure connection. On locked-down machines, download the script, read it, then run it if policy requires that extra step. If curl fails with a 403, a strange web-page error, or a syntax error near <, the setup and troubleshoot docs map errors to fixes.
Native install: Windows PowerShell
irm https://claude.ai/install.ps1 | iexirm is short for Invoke-RestMethod, and iex is short for Invoke-Expression. It’s the same trust story as the curl pipe: an official host, but still a script running on your machine. Your prompt should look like PS C:\... in PowerShell. If you see 'irm' is not recognized, you are in the older Command Prompt, not PowerShell.
Native install: Windows Command Prompt
curl -fsSL https://claude.ai/install.cmd -o install.cmd && install.cmd && del install.cmdThis one line downloads the Windows installer script, runs it, and then deletes it. It is for the older Command Prompt window; PowerShell uses the command shown above it.
If && blows up as “not a valid statement separator,” you are in PowerShell instead. Switch shells, or use the PowerShell one-liner above. Shell mix-ups cause a good chunk of “the install is broken” threads.
Homebrew (macOS, and Linux with brew)
brew install --cask claude-codeHomebrew offers two casks. claude-code tracks a stable channel that can lag about a week and skip bad releases. claude-code@latest tracks the newest build. Homebrew installs do not use the native auto-update path, so upgrade it yourself with brew upgrade claude-code (or the @latest form if that is what you installed).
WinGet (Windows)
winget install Anthropic.ClaudeCodeThis installs Claude Code with WinGet, the package installer built into Windows. Use it if your company prefers software installed through a package manager rather than a downloaded script.
WinGet also does not auto-update, so periodically run winget upgrade Anthropic.ClaudeCode yourself. Setup docs note other Linux package managers, such as apt, dnf, and apk, for Debian, Fedora, Red Hat, and Alpine, when that matches your distribution’s norms.
Which install should you pick?
| Path | Good when | Watch-out |
|---|---|---|
| Native curl / irm | You want the default path and background updates | Script trust; corporate SSL inspection can break curl |
| Homebrew cask | You already manage tools with brew | Manual upgrades; pick stable vs latest on purpose |
| WinGet | Windows team standard is winget | Manual upgrades; upgrade may fail while the app is running |
| Desktop / IDE only | You are not ready for a CLI install today | You still need login and a project folder; deep shell power may lag |
If your company images machines with a fixed software catalog, ask IT whether Claude Code is already packaged. Fighting the package manager usually loses.
Verify the install, open a project, and log in
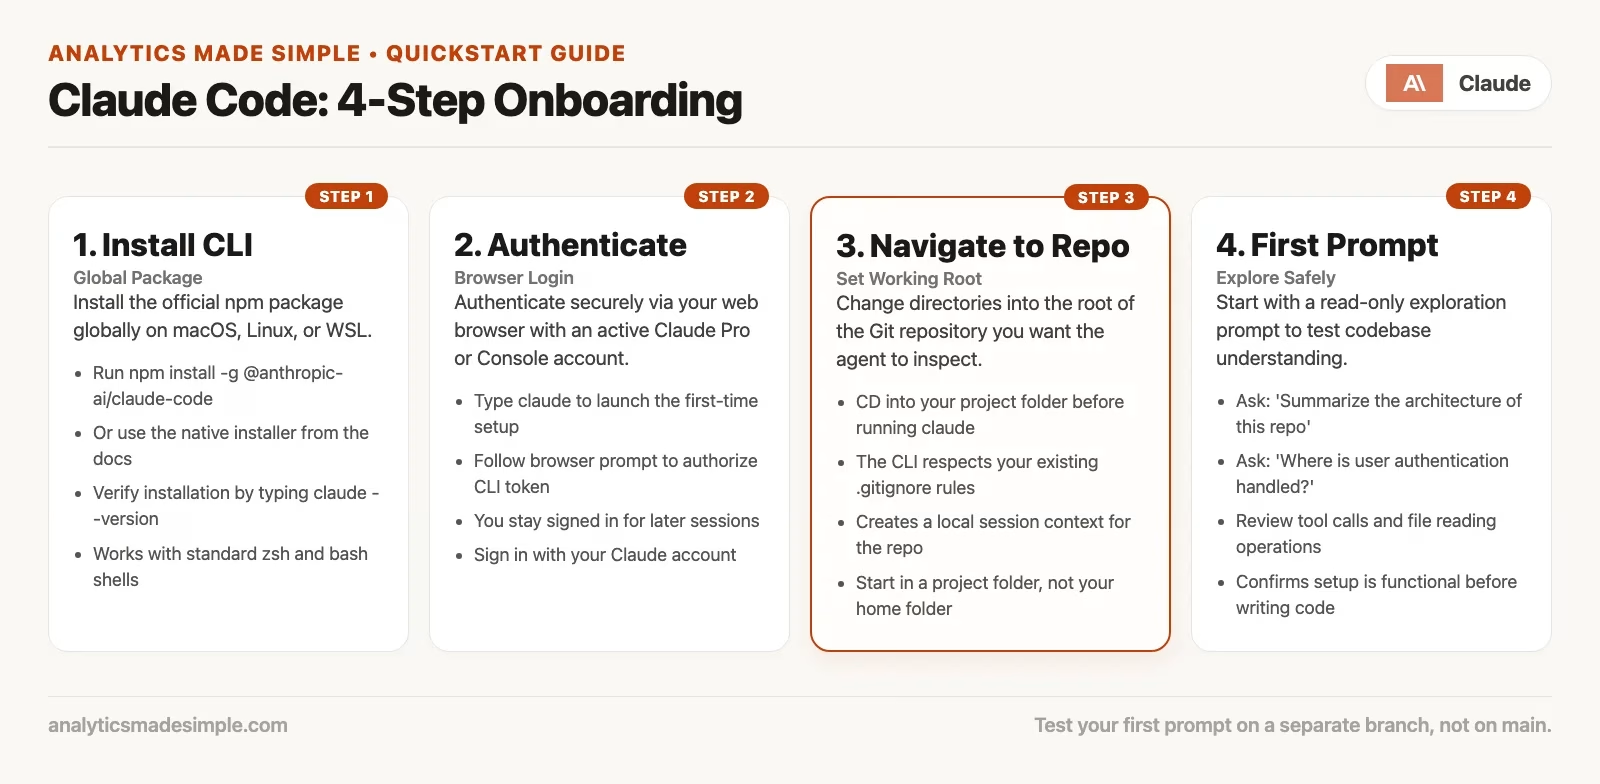
--version, cd into a project, start claude, complete /login, then ask a small questionAfter install, prove the binary exists:
claude --versionYou should see a version string that mentions Claude Code. If the shell says command not found, your system’s search path did not pick up the install. Open a new terminal window first. Still broken? Re-read the install method’s post-install note, since brew cask paths, the Windows user path setting, and WSL versus Windows host confusion are the usual suspects.
Start inside a real project directory, not your home folder full of screenshots:
cd /path/to/your/project
claude
These lines move into your project folder and start Claude Code there. Starting inside the project matters, because Claude Code can read and change files in the folder you start it from.
On first use, Claude Code prompts you to authenticate. Follow the browser flow for subscription or Console login. Inside a running session you can re-authenticate or switch accounts with:
/loginDocumented login paths include Claude Pro, Max, Team, and Enterprise subscriptions, Claude Console (paid API (the way one program connects to another) credits, with a Claude Code workspace created for cost tracking on first login), supported cloud providers such as Bedrock, Google Cloud’s agent platform, or Microsoft Foundry, and org-run gateways when an admin has preconfigured them. Your credentials stay stored so you are not repeating this browser dance every morning.
When the session is up, you should see the version, model, and working directory shown around the prompt. Type /help once so you know where the escape hatches live. Type /exit (or the documented Ctrl+D pattern) when you are done. These small rituals beat panic-closing the window mid-edit.
Claude Code also runs beyond the terminal
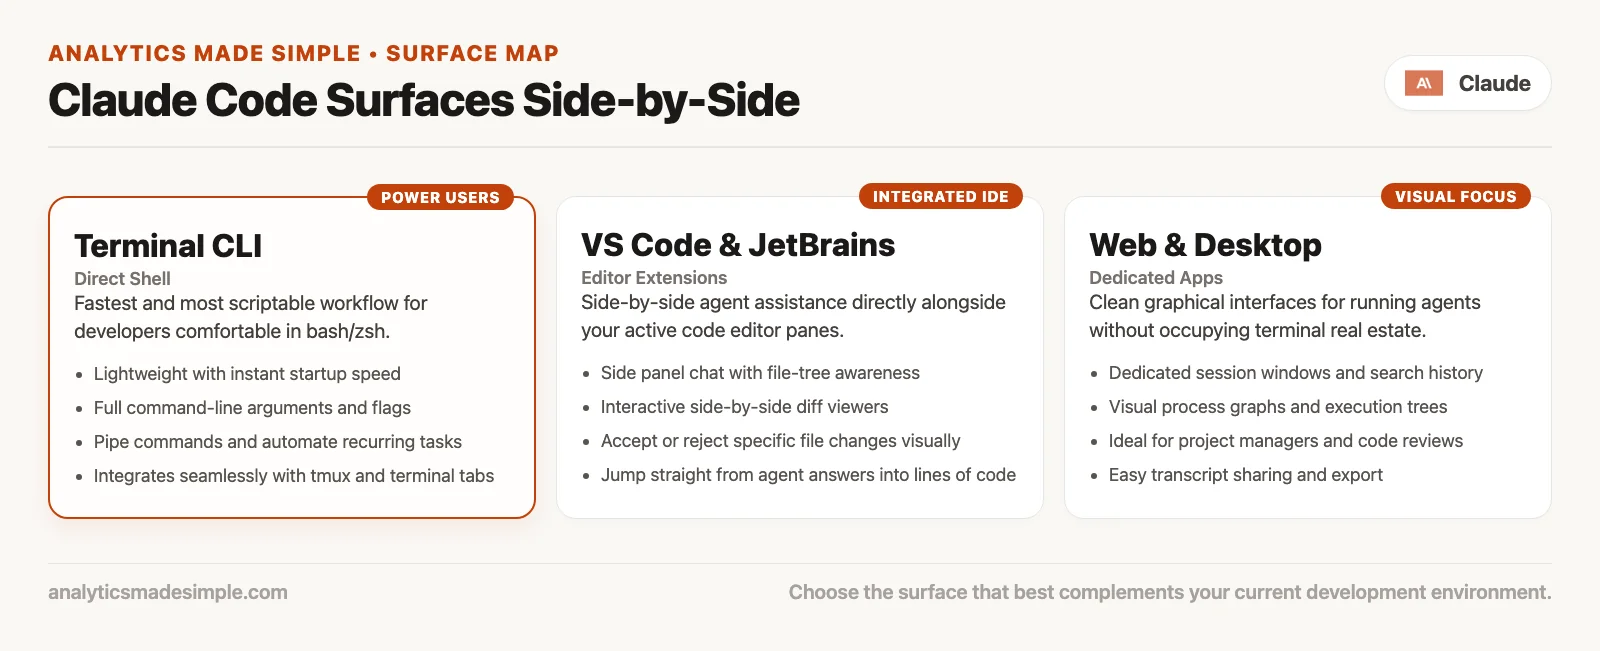
The terminal path is the one this post teaches end to end, because it matches the official quickstart and it forces you to notice which folder you are actually working in. Claude Code also shows up in other places:
- Terminal: the full agent loop, right in the project folder. Best when you already run git, tests, and package scripts from a shell.
- Visual Studio Code (VS Code) and compatible editors that take the extension: install the Claude Code extension from the marketplace. Docs note the extension can bundle a CLI for the chat panel, but running
claudein the built-in terminal still wants the standalone install. - JetBrains editors: a plugin path for people who live in IntelliJ, PyCharm, WebStorm, and similar tools.
- Desktop app: install Claude for macOS, Windows, or Linux, sign in, then open the Code tab. Useful when you want Code without any terminal ceremony. If the Code tab asks for an upgrade or an online sign-in, finish that flow before you assume the product is broken.
- Web: claude.ai/code for browser sessions. Handy on locked-down machines or for light parallel work. Deep local file work still usually favors the desktop app, an editor, or the terminal.
Pick one place to work for your first week. Learning login, permissions, and “where is my working directory” across five different interfaces at once is how people decide the tool is chaotic, when the chaos was really just the setup tour.
Permission modes without the fear fog
Claude Code is permissioned. In default (manual) mode it asks before many writes and sensitive actions. That pause is a feature, not a bug, and you can change how often it happens.
During a CLI session you press Shift+Tab to cycle modes. The common cycle is:
- default (often labeled Manual in the interface): Claude asks before edits. The safest mode for your first day.
- acceptEdits: auto-approves file edits, and some common filesystem commands within scope. You review later in the editor or with
git diff. - plan: Claude researches and proposes a plan without editing source until you approve it. Great when you’re still mapping out the repo.
Accounts and builds may also expose modes such as auto or bypass-style options. Those are power tools, so do not start day one in “never ask.” Official docs live under permission modes. On Windows, if Shift+Tab does nothing in some runtimes, docs mention Alt+M as an alternate for cycling modes when the usual input method is unavailable.
First-week rule: stay in default (manual) until you have watched Claude ask for three different kinds of actions and understood every prompt. Speed comes after trust, not before it.
Your first session script
Here is a concrete first run you can copy. Use a sandbox repo if production feels too risky.
1. Confirm you are in the right folder
In the shell, before claude:
pwd
ls
You want to see the project’s real root: package manifests, a README file (README means the short setup notes at the top of most projects), a .git folder, not a nested node_modules folder or a random Downloads subfolder. Being in the wrong working directory is the most expensive “Claude is dumb” false alarm there is.
2. Ask boring orientation questions
The official quickstart’s starter questions work because they are small:
what does this project do?where is the main entry point?what technologies does this project use?Open the paths it cites. If it never points at files you can click, slow down. You are training your own review muscle here, not collecting poetry about architecture.
3. Make one tiny change
Stay microscopic. Examples that fit a first run:
- Add a one-line comment to the README, so your first change is easy to review and impossible to break anything with.
- Fix a typo in a user-facing string.
- Add a trivial hello-world helper in a file that already exists, and delete it afterward if this is only a drill.
In default mode, read the permission prompt. Approve it only if the path and action match what you asked for. If Claude wants to install a global tool or rewrite half the tree for a typo fix, deny it and restate the scope.
4. Review before commit
Do not outsource the commit message and disappear. Ask Claude what changed if you want, then look for yourself:
git status
git diff
These two commands list the files Claude changed and show each changed line. Read them yourself before you commit, so you know exactly what goes into the change.
Or use your editor’s diff view instead. Commit only when you can explain the patch in one sentence to a teammate. If this was a throwaway drill, discard the change, because the win was the loop, not the line of code.
A worked example: first evening on a sample app
Imagine you cloned a small public Node API called notes-api into ~/src/notes-api. You have a Pro subscription, and you pick native install on macOS.
curl -fsSL https://claude.ai/install.sh | bash
claude --version
cd ~/src/notes-api
claude
Login completes in the browser. Back in the terminal you type what does this project do? Claude summarizes: an Express server, SQLite for notes, and tests using a runner you haven’t installed yet. It points at src/index.js and package.json. You open both, and the summary matches.
You stay in default permission mode. You ask: “Add a single sentence to the README under Overview that says local setup needs Node 20.” Claude proposes a diff, and you approve it. You run git diff. One file, one sentence, no surprise dependency (another package your code needs) changes. You commit with a message you wrote yourself: “docs: note Node 20 requirement.” That is a successful first run, and boring is exactly correct here.
What would a bad first evening look like instead? You start in acceptEdits, ask it to “modernize the whole stack,” approve a flurry of prompts you barely read, and end up with a half-migrated TypeScript rewrite, a new package manager lockfile, and no tests passing. The agent didn’t fail some ethics class. You skipped the seatbelt.
Accounts, limits, and money (light touch)
Code sessions burn more capacity than a short chat about dinner plans. That’s normal for agentic (where the AI takes many steps on its own) tools that read whole trees and run commands. Subscription plans market Code as included on Pro and Max, and on team or enterprise seats as documented at the time you subscribe. Console users pay with API-style credits. Cloud provider paths bill through your cloud account. None of those sentences replace the live pricing page on the day finance asks why usage spiked.
Practical habits:
- Prefer short, scoped sessions over “leave it running all day and hope.”
- Use plan mode when you are still exploring, so you don’t pay for a pile of wrong edits.
- On Console, watch the Claude Code workspace spend if your org created one on first login.
- If the product says you hit a limit, stop thrashing between alternate accounts. Fix the scope or the plan tier on purpose instead.
Common install and first-run failures
| Symptom | Likely cause | What to try |
|---|---|---|
claude: command not found | Search path or stale shell | New terminal; re-check install method; confirm binary path |
| Install script HTML/403 errors | Network filter, TLS inspection, wrong URL | Use corporate proxy settings; try alternate install; see troubleshoot-install docs |
| PowerShell vs Command Prompt confusion | Wrong shell for the one-liner | Match prompt: PS → irm; plain command prompt → install.cmd flow |
| Login loops | Browser blocked, wrong account, org SSO | Try /login; complete browser step; ask admin about gateway SSO |
| Code tab missing on desktop | Plan or auth incomplete | Upgrade/sign-in prompts; restart app after web auth |
| Agent edits the wrong project | Started Claude in the wrong directory | Exit, cd correctly, restart; verify with pwd |
| “It keeps asking permission” | Default mode | That is expected; cycle modes only when you mean to |
| Huge surprise diff | Vague prompt + acceptEdits | Revert; restart in plan or default; shrink the ask |
Safety rails for day one
- Do not paste production secrets into the prompt “just this once.”
- Do not point Code at a directory that mixes personal tax PDFs with the repo.
- Do not approve shell commands you would not type yourself.
- Do not skip
git statusjust because the interface felt confident. - Do not learn on the branch that deploys Friday afternoon.
If your org already has instruction files such as CLAUDE.md or AGENTS.md, leave them alone on day one unless a teammate asked you to edit them. Those files steer the agent for everyone on the team. Later parts of this series cover memory, skills, and instruction files properly.
Questions people ask before they install
Do I need Node.js to install Claude Code?
Native install is built so you are not assembling a separate Node toolchain just to get the agent running. Your project may still need Node, Python, or whatever its README demands, but that is project setup, not Claude Code install.
Can I use Code with only the free chat tier?
The quickstart points at paid Claude subscriptions, Console, or cloud provider access. Free chat alone is usually not the path in. Confirm on the live pricing page, and do not invent a workaround that violates terms or company policy.
Is the desktop app “the same” as the terminal tool?
Same family, different shell. Features, permission screens, and update channels can differ depending on where you run it. Learn one option deeply, then expand from there.
Should I start in plan mode or default?
Default (manual) for first edits. Plan when the task is large and you want a proposal before any write. acceptEdits once you already trust the loop and will review everything through git.
How to practice this week
- Install using the method that matches your operating system’s norms.
- Run
claude --versionand screenshot it for your own notes. - Open a sandbox repo, and complete login.
- Ask what the project does and where the entry point is. Open those files yourself.
- Make one reversible docs or comment change in default mode.
- Review the diff. Commit or discard on purpose.
- Optional: open the same project once in VS Code or the desktop app so you know that second option exists, then go back to one primary place to work.
Quick recap
- Install via native script (recommended), Homebrew cask, or WinGet, then verify with
claude --version. - Always
cdinto the project before runningclaude, and use/loginwhen auth is wrong. - Places to work include the terminal, VS Code, JetBrains, desktop, and web; pick one for week one.
- Default permission mode asks first;
Shift+Tabcycles default, then acceptEdits, then plan. - First questions map the repo, the first change stays tiny, and you review before you commit.
Series notes
This is Part 1 of the Claude Code tutorial. The next post covers talking to a codebase: asking questions, exploring, then making changes. For product context outside the command line, stay oriented with the Claude product map and the everyday chat skills in Learn Claude.
Sources
Research and further reading used for this article. Re-check before you write policy, since product interfaces move; pages checked in September 2026.
- Claude Code Docs: Quickstart (install commands, version check, login, first questions, first change, permission mode note)
- Claude Code Docs: Advanced setup (install methods, Homebrew/WinGet notes, updates, desktop pointer)
- Claude Code Docs: Choose a permission mode (default, acceptEdits, plan, Shift+Tab cycle)
- Claude Code Docs: Use Claude Code in VS Code (extension install, CLI vs panel notes)
- Claude Code Docs: Get started with the desktop app (desktop install and Code tab)
- Claude Code Docs: Interactive mode (keyboard shortcuts including mode cycling)
- Claude Code Docs: Overview (surfaces and product orientation)
- Analytics Made Simple: Claude product map (chat vs Code vs Cowork orientation)
- Analytics Made Simple: Learn Claude from scratch (everyday Claude before deep tooling)
Keep going
Same lessons in your feed
Short diagrams, hooks, and weekly tutorials on Substack, Instagram, X, and Facebook.