
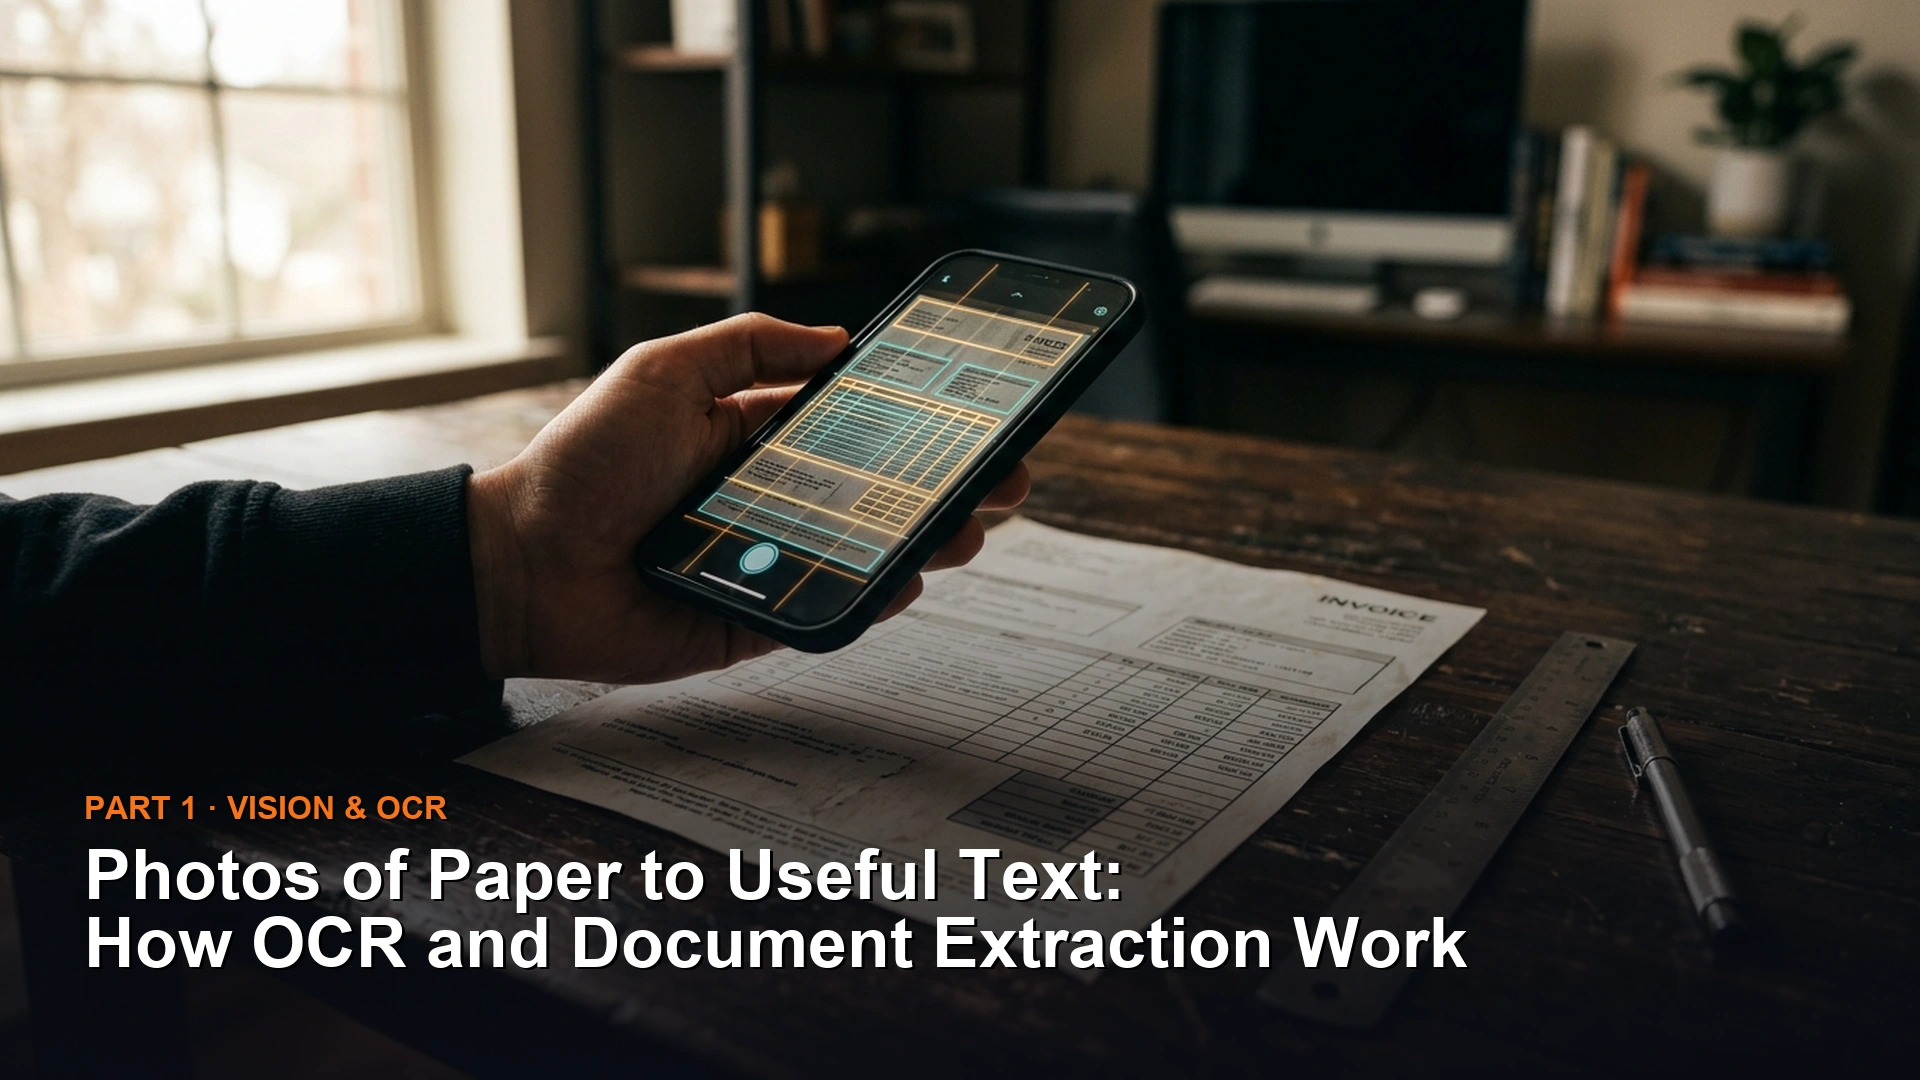
Turning a phone photo of paper into clean, searchable text takes OCR (optical character recognition, software that reads letters and numbers inside an image) plus tools that straighten the page and recognize tables. Without those cleanup steps, a phone photo produces confident errors rather than dependable data.
Say you snap photos of a stack of wrinkled receipts on a café table so an app can total your expenses. The light is dim, your hand casts a shadow, and the phone is tilted. Unless the software straightens the image, finds the text, and understands the table first, it can return numbers that look confident and are wrong.
Why a phone photo confuses text recognition software
To see why a raw photo causes trouble, look at how a scanner works. When a document passes through a flatbed or feed scanner, a uniform strip of light sweeps across a fixed distance from the page. That distance between the glass and the sensor stays exactly the same across every part of the page. The resulting image is perfectly square-on, with no perspective skew and even contrast throughout.
A smartphone photo breaks every one of those assumptions. When someone holds a phone above a desk, several problems happen at once:
The problems a phone photo introduces
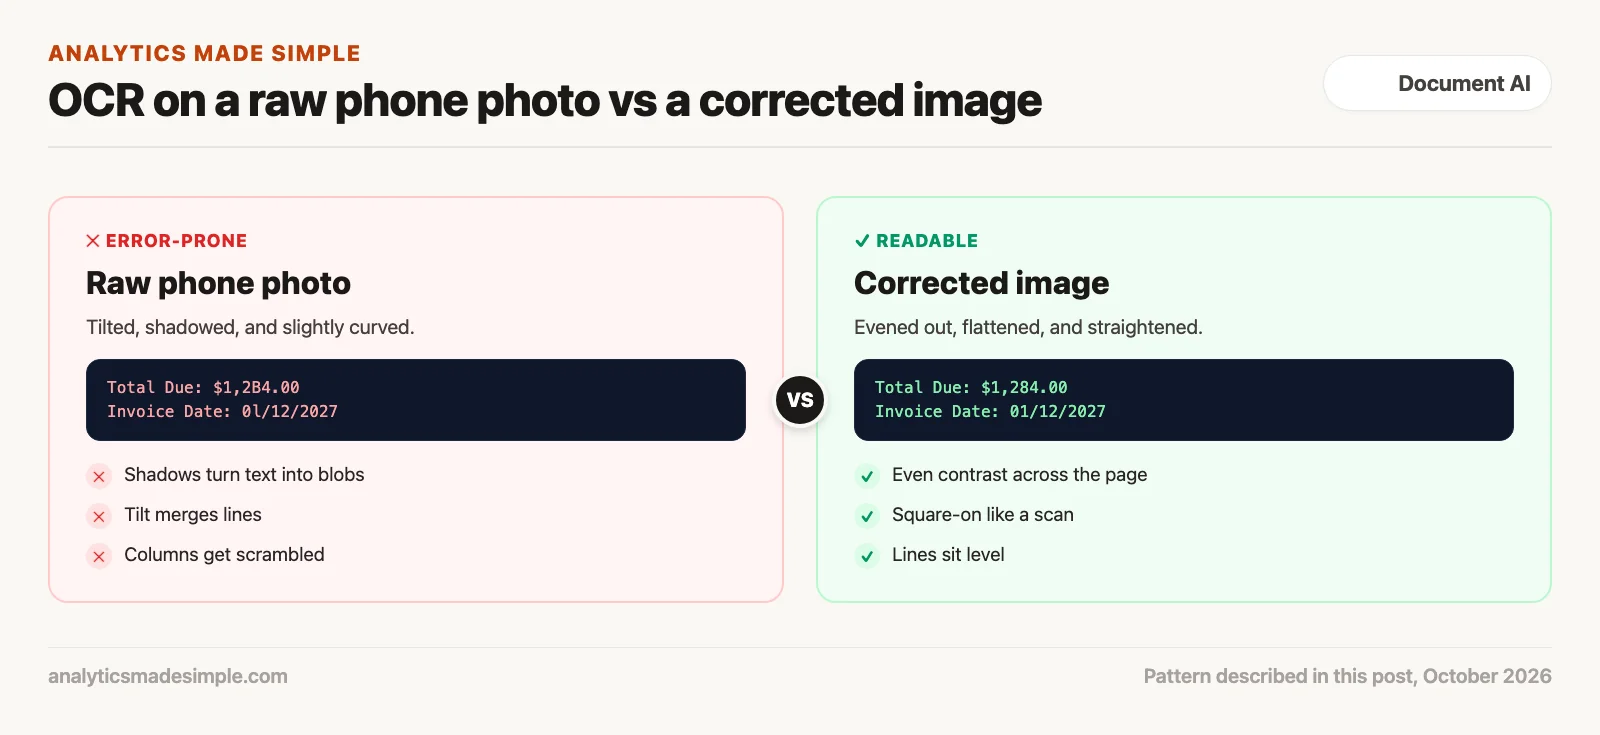
A phone camera adds tilt and a slight lens curve. Light falls unevenly across the page, and your hand can cast a shadow over important numbers.
How software fixes it
Software evens out contrast region by region. It turns the tilted page back into a flat rectangle and rotates it so the lines sit level.
Start with the angle problem. A person holding a phone rarely lines the camera up exactly parallel to the desk. If the phone tilts just ten degrees, a standard sheet of paper projects onto the camera as a trapezoid. Text near the top of the page looks smaller and more cramped. Text near the bottom looks bigger and more spread out. Software expecting evenly spaced lines will miscalculate the spacing and merge lines together.
Then there’s uneven lighting. In an office or at home, overhead lights and desk lamps create harsh brightness differences across a page. A person’s own hand or phone often casts a dark shadow over the bottom third of the document. A simple brightness-cutoff method tries to separate black text from white paper using one threshold for the whole image. But that shadowed white paper can look darker than the brightly lit black text elsewhere on the page. The result: the entire shadowed corner turns into an unreadable black blob, and whatever text was there is gone.
As Figure 1 below shows, feeding an uncorrected smartphone photo straight into text recognition software leads to a high error rate and scrambled layout. Running that same photo through a proper image-correction step first gets it back to scanner-quality clarity.
The four-step image correction process
A messy phone photo needs several fixes before any text is read. That process breaks into four steps: evening out contrast, finding the paper’s edges, correcting perspective, and straightening any tilt.
The first step evens out uneven lighting. Instead of converting a color image straight to black-and-white with one brightness cutoff for the whole page, the software first converts it to grayscale. Then it evens out contrast in small local patches across the page, rather than the image as a whole. That process brightens faint ink strokes while avoiding over-brightening flat, even areas. The net effect erases gradual lighting differences and soft shadows.
Next, the software finds the physical edge of the paper against the desk behind it. By smoothing out sensor grain and then running a standard edge-detection method, the software finds continuous lines in the image. From there, it can identify the largest four-sided shape in the frame: the actual corners of the piece of paper.
| Correction step. | How it works. | Problem it fixes. | Effect on accuracy. |
|---|---|---|---|
| Evening out lighting. | Local contrast correction in small patches. | Hand shadows and uneven overhead lighting. | Prevents black blobs in dark corners of the page. |
| Fixing perspective. | A four-point geometry correction. | Trapezoid shape from a tilted camera. | Restores even letter shapes and line spacing. |
| Straightening tilt. | Detecting the dominant line angle and rotating. | Paper photographed at an angle. | Lines up text horizontally for reading. |
| Removing noise. | Smoothing filters that preserve edges. | Camera grain and paper fiber texture. | Removes fake periods, commas, and speckles. |
| Sharpening small text. | Upscaling plus a sharpening pass. | Tiny legal disclaimer text at low resolution. | Makes small digits and decimal points legible. |
Once the software has the four corners of the page, it calculates a transformation that maps the distorted trapezoid onto a proper rectangle. That rectangle matches the paper’s actual dimensions, since standard Letter and international A4 sizes have known, fixed proportions. This step restores every line of text to true horizontal alignment and gives every letter a consistent, even shape.
Finally, the corrected image gets one more pass to remove any remaining tilt. Even after fixing the perspective, the paper may still sit a few degrees off from level. By measuring the dominant angle of the text lines, the software rotates the whole image until the lines sit level. The result looks much like a flat scan of the page.
Two separate jobs: finding the text, then reading it
Next, the clean image goes to the text reader. This is often called OCR, short for optical character recognition. Modern text recognition systems don’t try to read a whole document in one pass. Instead, they split the job into two separate steps: finding where the text is, and then actually reading it.
The first step, finding the text, locates where words sit on the page. Older systems relied on simple rules: scanning for horizontal bands of dark pixels separated by white space. Those methods broke down completely on multi-column layouts, decorative fonts, or uneven line spacing. Modern text-detection models learn where text probably is instead. Two well-known examples are DBNet and CRAFT (Character Region Awareness for Text Detection).
These models produce a kind of probability map showing how likely it is that text sits at each point in the image. From there, the software draws a precise box or outline around each word or line of text. Every detected chunk of text gets its own set of coordinates marking exactly where it sits on the page.
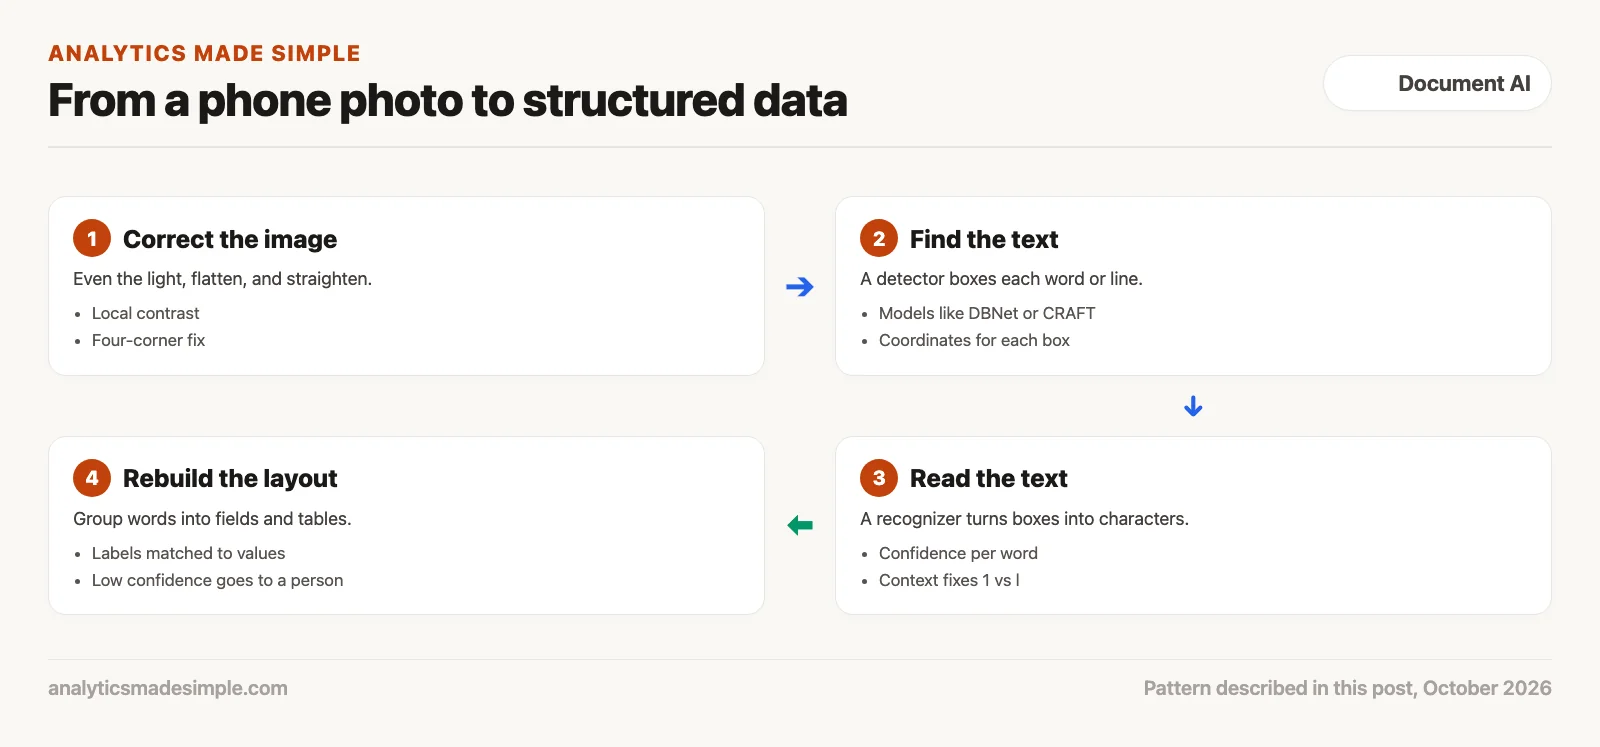
Figure 2 shows the complete document extraction process, following the data from the original photo through geometry correction, text recognition, and finally into structured, usable fields.
The second step, actually reading the text, takes the cropped image snippets the detector found and turns those pixels into real letters and numbers. A common approach pairs two parts. One part picks out visual features. The other reads them in order and uses context. Newer approaches use the same technology as modern language models.
In that combined approach, one part of the network pulls out high-level visual features from the text snippet. A second part then reads those features left to right, using surrounding context. For example, it can tell the digit “1” from the letter “l” by checking whether the nearby characters are numbers or letters. That process calculates the single most likely sequence of characters without needing the image pre-sliced into individual letters first.
Every word that comes out of this process gets not just the text itself, but also a confidence score between 0 and 1. In software that handles money, that score matters a lot. Pick a cutoff, such as 0.85. If a dollar total or ID number scores below it, the system sends the document to a person for a second look instead of saving a possible mistake.
Why plain text alone isn’t enough
A common mistake is to think plain text is the whole goal. In practice, plain text on its own is nearly useless for real business documents. Invoices, tax forms, shipping manifests, and bank statements communicate meaning through their layout: whitespace, table alignment, and visual structure carry real information.
Picture a standard balance sheet with two columns: current assets on the left, current liabilities on the right. A text recognition tool that just reads top to bottom, left to right, across the full width of the page runs into trouble here. It reads the first row of assets immediately followed by the first row of liabilities, on that same horizontal line. The resulting text scrambles two unrelated sets of numbers into one confusing jumble.
To produce anything usable, a document pipeline (a chain of automated steps that moves and cleans data) has to keep track of exactly where each piece of text sits on the page. By looking at how those positions relate to each other, the software can group scattered words back into coherent pieces:
- Grouping columns: Spotting text blocks that line up vertically. This keeps table columns intact even with no visible border lines.
- Matching labels to values: Connecting a label like “Invoice Date:” or “Total Amount Due:” to whichever number or text sits closest to it.
- Sorting by section: Using font size, boldness, and spacing to tell headers, line items, and summary totals apart.
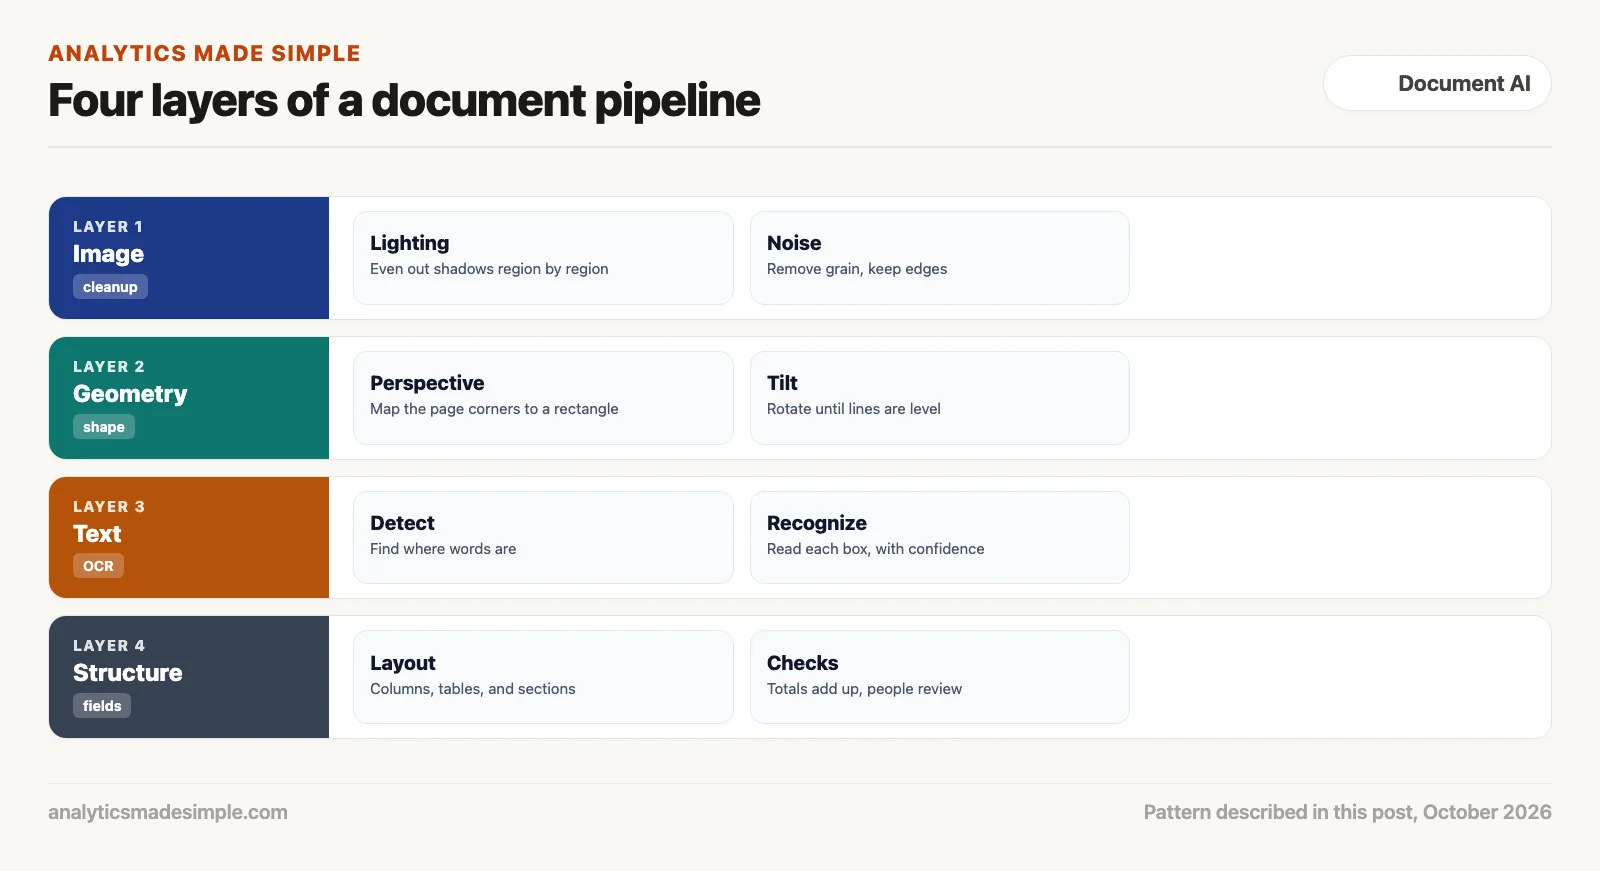
Figure 3 shows the four layers of a modern document processing system, from image correction and geometry fixing up through text recognition and structured field extraction.
A working example of a document pipeline in Python
To make these ideas concrete, the Python script below is a working example of a document pre-processing and extraction pipeline. It takes a raw mobile photo, corrects contrast, straightens the image, runs text recognition with positional coordinates, and groups the results into structured label-and-value pairs.
# document_extraction_pipeline.py
# Production pre-processing, deskewing, and spatial extraction pipeline

import cv2
import numpy as np
import pytesseract
from dataclasses import dataclass
from typing import List, Dict, Tuple, Optional

@dataclass
class ExtractedToken:
    text: str
    confidence: float
    bbox: Tuple[int, int, int, int] # x, y, width, height

class DocumentPreprocessor:
    def __init__(self, target_dpi: int = 300):
        self.target_dpi = target_dpi

    def normalize_illumination(self, image: np.ndarray) -> np.ndarray:
        # Converts to grayscale and applies CLAHE to neutralize ambient shadows
        if len(image.shape) == 3:
            gray = cv2.cvtColor(image, cv2.COLOR_BGR2GRAY)
        else:
            gray = image.copy()

        clahe = cv2.createCLAHE(clipLimit=2.0, tileGridSize=(8, 8))
        normalized = clahe.apply(gray)
        return normalized

    def deskew_document(self, image: np.ndarray) -> Tuple[np.ndarray, float]:
        # Detects document orientation angle using Hough lines and deskews
        thresh = cv2.adaptiveThreshold(
            image, 255, cv2.ADAPTIVE_THRESH_GAUSSIAN_C,
            cv2.THRESH_BINARY_INV, 15, 8
        )

        # Calculate horizontal line angles
        lines = cv2.HoughLinesP(thresh, 1, np.pi / 180, threshold=100, minLineLength=100, maxLineGap=10)
        if lines is None:
            return image, 0.0

        angles = []
        for line in lines:
            x1, y1, x2, y2 = line[0]
            angle = np.degrees(np.arctan2(y2 - y1, x2 - x1))
            if abs(angle) < 45.0: # Filter out vertical lines
                angles.append(angle)

        if not angles:
            return image, 0.0

        median_angle = float(np.median(angles))
        h, w = image.shape[:2]
        center = (w // 2, h // 2)

        rot_mat = cv2.getRotationMatrix2D(center, median_angle, 1.0)
        rotated = cv2.warpAffine(
            image, rot_mat, (w, h),
            flags=cv2.INTER_CUBIC,
            borderMode=cv2.BORDER_REPLICATE
        )
        return rotated, median_angle

class SpatialDocumentExtractor:
    def __init__(self):
        self.preprocessor = DocumentPreprocessor()

    def process_and_extract(self, image_path: str) -> Dict[str, any]:
        raw_img = cv2.imread(image_path)
        if raw_img is None:
            raise FileNotFoundError(f"Could not load image from {image_path}")

        # 1. Pre-processing: Illumination flattening & deskewing
        normalized = self.preprocessor.normalize_illumination(raw_img)
        deskewed, detected_skew = self.preprocessor.deskew_document(normalized)

        # 2. Binarization for OCR
        binary = cv2.adaptiveThreshold(
            deskewed, 255, cv2.ADAPTIVE_THRESH_GAUSSIAN_C,
            cv2.THRESH_BINARY, 21, 10
        )

        # 3. Two-stage OCR with character bounding boxes
        ocr_config = r"--oem 3 --psm 6"
        data = pytesseract.image_to_data(binary, output_type=pytesseract.Output.DICT, config=ocr_config)

        tokens: List[ExtractedToken] = []
        num_boxes = len(data["text"])

        for i in range(num_boxes):
            text = data["text"][i].strip()
            conf = float(data["conf"][i])
            if text and conf > 30.0: # Suppress low-confidence noise
                x, y, w, h = data["left"][i], data["top"][i], data["width"][i], data["height"][i]
                tokens.append(ExtractedToken(text=text, confidence=conf, bbox=(x, y, w, h)))

        # 4. Spatial key-value extraction (e.g., finding monetary totals)
        extracted_data = self._parse_spatial_entities(tokens)
        extracted_data["detected_skew_deg"] = round(detected_skew, 2)
        extracted_data["total_tokens"] = len(tokens)

        return extracted_data

    def _parse_spatial_entities(self, tokens: List[ExtractedToken]) -> Dict[str, any]:
        # Heuristic spatial search: finds 'Total' label and extracts adjacent number
        results = {"invoice_totals": [], "extracted_numbers": []}

        for idx, token in enumerate(tokens):
            if "total" in token.text.lower():
                # Search nearby tokens to the right or immediately below
                for neighbor in tokens[idx + 1: idx + 6]:
                    clean_val = neighbor.text.replace("$", "").replace(",", "")
                    try:
                        val = float(clean_val)
                        results["invoice_totals"].append({
                            "label": token.text,
                            "value": val,
                            "confidence": neighbor.confidence,
                            "bbox": neighbor.bbox
                        })
                        break
                    except ValueError:
                        continue

        return results

if __name__ == "__main__":
    extractor = SpatialDocumentExtractor()
    print("[INIT] Document Intelligence Pipeline initialized.")
Comparing the different document AI approaches
You have many options for pulling text out of documents. They range from small open-source libraries to cloud services and AI models that can read images.
Figure 4 brings these trade-offs together into one comparison, weighing speed, accuracy, and cost across the four main approaches to document extraction.
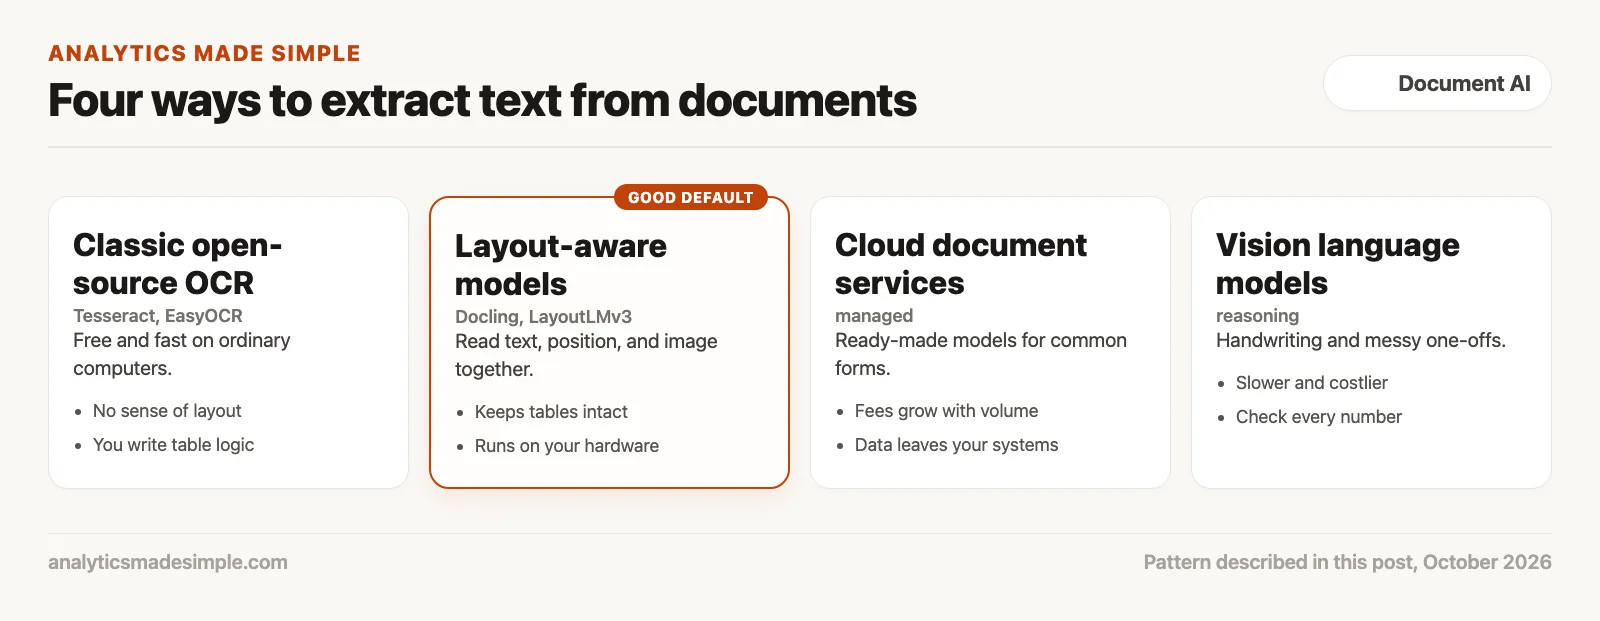
Traditional open-source text recognition tools like Tesseract and EasyOCR remain hard to beat on cost. Running on a standard processor, they can process pages quickly with no licensing fees at all. The catch: they have no built-in sense of layout, so you need to write your own logic to handle multi-column documents and complex forms.
Managed cloud document services from major cloud providers offer real convenience. They come with models already tuned for common forms like tax documents, invoices, and driver’s licenses. The trade-offs are real. It is hard to switch vendors later, fees climb with volume, and sensitive records have to leave your own systems.
Vision-capable language models excel at unstructured reasoning. They can read damaged old records, messy handwriting, and long legal documents that trip up traditional software. The downside is cost and speed. They are too slow and expensive for millions of routine pages. They can also quietly get a number wrong on a faint balance sheet.
For most modern pipelines, the current sweet spot is a specialized hybrid document AI model, the kind used in open tools like Docling and LayoutLMv3. These models process spatial position, the visual image, and the text itself together, in one system. They run on your own hardware, keep complex table structures intact, and avoid per-page cloud fees. Measure their accuracy on a sample of your own documents before you rely on them.
Your next step
Pick ten real documents from your work, mixing clean digital files and scans, and run them through one extraction tool. Check the numbers and names against the originals. Seeing where it fails on your own documents tells you which approach in this post you actually need.
Keep going
Same lessons in your feed
Short diagrams, hooks, and weekly tutorials on Substack, Instagram, X, and Facebook.
Merch on Etsy
Open store →



This path is for you if a photo of a receipt or a scanned contract needs to become text you can check, not a guess in a chat. It is the vision and document path: what the model can read, and where a human still has to look. No part is live on this page yet. Start with Practical AI for what not to paste, and come back when part 1 is up.
- 1 How OCR and AI turn photos of paper documents into useful text Build document capture as a pipeline: correct the image, detect text, then extract structure. Classic OCR still matters before any LLM reasons.
- 2 AI vision models vs classic OCR: which to use for reading documents Hybrid document AI: OCR for precise text and numbers, vision LLMs for semantic layout and messy handwriting. Do not let fluent models invent totals. Scheduled · November 6, 2026
- 3 How to get clean text out of PDFs and scanned documents with AI Detect PDF type, preserve reading order, and chunk on layout before you embed. Columns and tables break if you slice by character count alone. Scheduled · November 8, 2026
- 4 How to extract text from PDFs on your own computer with Docling Run open document tools like Docling on CPU or GPU for private, batch extraction. Keep cloud APIs for spikes that need managed scale. Scheduled · November 10, 2026
- 5 How to extract tables, invoices, and form fields from documents with AI Extract structured documents with table geometry plus schema validation. Plain text dumps are not invoice systems. Scheduled · November 12, 2026
- 6 How to have people check AI-extracted document data before you trust it Design document AI with confidence scoring and human review queues. High softmax alone is not a payment authorization. Scheduled · November 14, 2026
- 7 How to remove private data from documents before an AI tool reads them Sanitize document AI inputs at the byte layer before OCR or LLM vision. Overlays and cloud defaults are not enough for PHI, PII, and regulated filings. Scheduled · November 16, 2026
- 8 When a phone scanner app is enough to turn paper forms into data Use good lighting and a scanner app when field capture quality matters more than fancy models. Save heavy document AI for pages that still fail after clean scans. Scheduled · November 18, 2026
Series notes
This is Part 1 of Vision OCR extraction from scratch. Next: LLM vision vs classic OCR.
Sources
- OpenCV, Image thresholding tutorial, including adaptive thresholding.
- Tesseract, Tesseract user manual.
- Minghui Liao and others, Real-time Scene Text Detection with Differentiable Binarization (DBNet), 2019.
- Youngmin Baek and others, Character Region Awareness for Text Detection (CRAFT), 2019.
- Yupan Huang and others, LayoutLMv3: Pre-training for Document AI with Unified Text and Image Masking, 2022.
- Docling, an open-source document parsing library, on GitHub.